

Can my truck safely haul this?
Four limits have to be satisfied at once, and most people only ever check one. This does the arithmetic and tells you which one actually binds.
Demonstration figures only
These buttons do not describe your vehicle and must not be used to decide whether your rig is legal or loaded correctly. They fill the form with example numbers so you can see what each field is asking for. Every one of them has to be replaced with a figure read off your own door sticker, tire and loading placard, hitch, and trailer data plate before the calculator will return a result.
Why there is no year, make and model list. A single model year of one pickup can be rated anywhere from about five thousand to thirteen thousand pounds of towing depending on engine, cab, bed, drivetrain, axle ratio and whether it has the tow package. Payload varies truck by truck even on the same lot. A dropdown would give most people a confidently wrong number, and the wrong direction is the dangerous one.
Where your real numbers are
Open the driver's door and look at the jamb. There is a sticker there, usually white or yellow, and it carries the two numbers that matter most.
- GVWR. The most the vehicle may weigh, loaded, on its own wheels.
- The payload line. Usually printed as something like the combined weight of occupants and cargo should never exceed XXXX lb. That figure already accounts for your specific truck. Tongue weight comes out of it.
- Tire and rim sizes and cold pressures, which is also where to check you are running what the vehicle expects.
GCWR and the tow rating are in the owner's manual, usually in a towing table you have to match to your exact configuration. The hitch rating is stamped on the hitch itself.
If you cannot find the payload line, weigh the truck as you normally drive it at a certified scale and subtract from GVWR. That is the real answer anyway.
The numbers
Payload, not tow rating, is usually what stops you
Ask somebody what their truck can tow and they will quote the big number off the brochure. That number assumes an empty truck with one driver and nothing else in it.
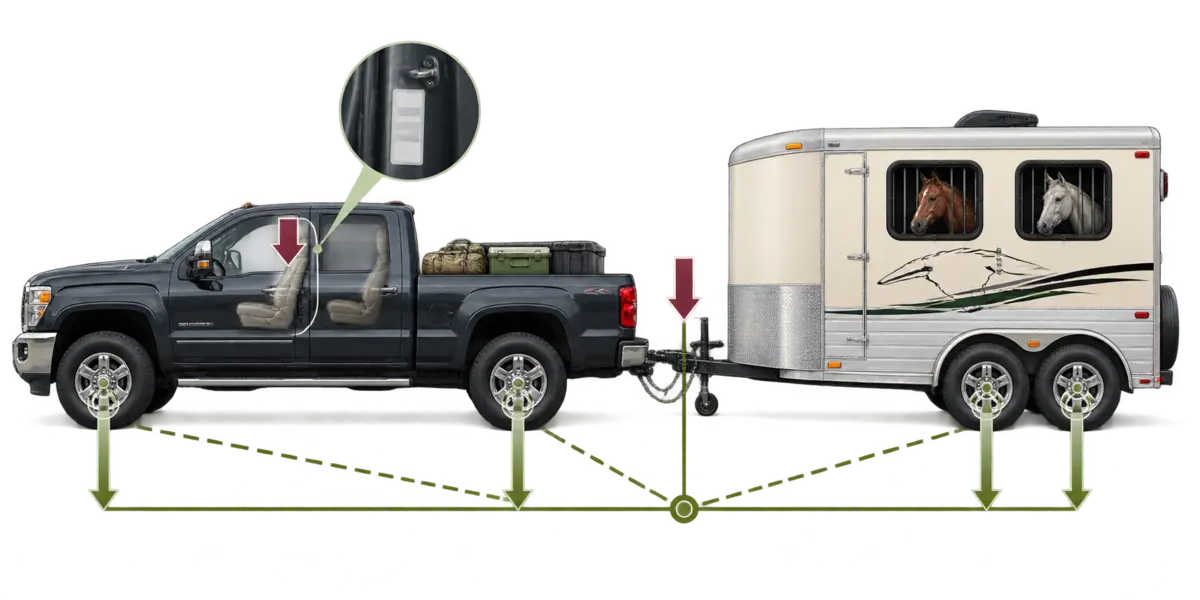
Everything you put in or on the truck comes out of one payload budget: passengers, dogs, tack in the back seat, the toolbox, and the tongue or pin weight of the trailer pressing down on the hitch. On a bumper pull that is roughly ten to fifteen percent of the loaded trailer. On a gooseneck it is more, commonly twenty to twenty five percent, because the load sits over the rear axle.
A half ton truck rated to tow nine thousand pounds may only have fifteen hundred pounds of payload. Two horses in a gooseneck can put more than that on the hitch alone, before anybody gets in. The truck will pull it. That was never the question.
The four limits, all at once
- Trailer GVWR. The trailer's own rating, loaded.
- Tow rating. What the vehicle may pull.
- Payload and GVWR. What the vehicle may carry, tongue weight included.
- GCWR. Truck and trailer and everything in both, added together.
Brakes, tires and the hitch matter too and are not in the arithmetic. Trailer brakes need to work and be adjusted, tires need to be rated for the load and not aged out, and the ball, coupler and receiver each carry their own rating. Horses also shift their weight as you drive, which is why a rig that is marginal on paper behaves worse than the numbers suggest.
Hooking up, in order
If you have never done this alone, this is the sequence. Tick as you go. It saves in this browser, so you can come back to it next time.
Hitching up
- Chock the trailer wheels before you do anything else.
- Back up square and centered. Take three attempts rather than one bad one.
- Lower the coupler fully onto the ball, then latch it and put the pin in.
- Raise the jack all the way up and stow it.
- Cross the safety chains under the tongue so it would land in the cradle, then clip them to the vehicle.
- Clip the breakaway cable to the vehicle, not to the chains or the ball.
- Plug in the lights.
- Remove the chocks.
- Do the tug test: brake controller on manual, gentle pull forward. If the coupler is not latched you will find out here at two miles an hour.
Lights and brakes, every trip
- Running and marker lights on, walk the whole trailer.
- Left indicator, then right. Have somebody watch, or use a wall or a window at night.
- Brake lights.
- Trailer brakes: set the controller and pull the manual lever at walking pace. You should feel the trailer grab.
- Adjust gain so the trailer slows you without locking or dragging.
- Breakaway battery charged and the cable intact.
- Tire pressures cold, including the spare.
- Check the tire date codes at least yearly. Age kills trailer tires, not miles.
- Look under the mats for floor rot at least once a year.
Loading
- Trailer hitched to the vehicle before any horse gets on. Never load onto an unhitched trailer.
- Heaviest horse on the driver's side in a straight load.
- Butt bar up first, then tie.
- Quick release knot or a breakaway tie, short enough that a leg cannot get over it.
- Doors and ramp latched, dividers secured.
- Untie before the butt bar comes down when unloading.
Before you pull out
- Paperwork in the truck: health certificate, Coggins, proof of ownership.
- Certified weed free hay if you are heading to public land.
- Water, buckets, spare halter and lead per horse.
- Sharp knife somewhere you can reach from the driver's seat.
- Spare tire inflated, and a jack that fits the trailer.
- Somebody knows your route and when you expect to arrive.
Trailer plugs and wiring
Common North American color conventions vary, and more than one is in use. Verify pins and functions against the manufacturer's diagram and a circuit tester before you cut, splice or trust a wire.
The four you will most often meet on a 4 way flat
- White Ground. The one that causes most faults.
- Brown Tail, running and marker lights.
- Yellow Left turn and brake light.
- Green Right turn and brake light.
This is the most common arrangement on a 4 way flat, not a guarantee. Aftermarket harnesses, repairs and imported trailers all depart from it, and the 7 way blade below has two competing color standards that disagree with each other. Treat color as a hint and the pin position plus a tester as the answer.
What the bigger plugs add
- Blue Depends on the connector. On a 6-way round and a 7-way RV blade it is electric brakes; on a 5-way flat it is the reverse / surge-brake lockout lead, not a brake lead. Check the connector before you assume.
- Black or red 12 volt auxiliary, battery charge.
- Yellow, on a 7-way RV blade Reverse lights. Note that yellow is left turn and brake on a 4-way flat, which is exactly the sort of overlap that makes color an unreliable guide.
The 7 way blade, which is what most horse trailers use
| Function | Traditional RV blade color | Notes |
|---|---|---|
| Ground | White | Biggest single cause of odd faults. Check this first, always. |
| Tail and marker | Green | Running lights. |
| Left turn and brake | Red | |
| Right turn and brake | Brown | |
| Electric brakes | Blue | The one that matters most with a live load behind you. |
| 12 volt auxiliary | Black | Charges the breakaway battery and runs interior lights. |
| Reverse | Yellow | Yellow, not purple. On a 4-way flat yellow is left turn and brake instead. |
Color conventions vary, and the same color means different things
The table above is the traditional RV blade arrangement as published by CURT Manufacturing. Other conventions exist and disagree with it, and the same color changes meaning between connectors: blue is electric brakes on a 6-way round and a 7-way blade, but the reverse / surge-lockout lead on a 5-way flat, and yellow is reverse on a 7-way blade but left turn and brake on a 4-way flat.
Which means if you open a junction box and the colors do not match what you expected, you have probably not found a fault. Trace by pin position, not by color, and test with a circuit tester rather than assuming.
When something does not work
Everything is dead
Ground first. Then the vehicle side fuse, then the plug itself. Corrosion inside the connector is extremely common on a trailer that lives outside.
Clean the pins with a small brush, add dielectric grease, and keep the cap closed.
Lights are dim or odd
Nearly always a bad ground. A trailer will try to find a path back through whatever it can, which is why a bad ground makes the left indicator flash the running lights.
Ground should be a clean bare metal connection on the frame, not a painted bolt.
Brakes do not grab
Check the blue wire, the controller gain setting, and the breakaway battery. Test at walking pace with the manual lever before you leave, every trip.
Do not haul horses with brakes you have not tested.
Ticks are saved on this device only. Nothing is sent anywhere. The full hauling guide covers driving, paperwork and what to do when something goes wrong. Need parts or repair? Search the Horse Services Directory.