
The saddle guide: fit, pads, cinches and the honest answer on bits.
A large share of what gets diagnosed as a training problem is a fit problem wearing a costume. This is how to check it yourself, in about ten minutes, before you spend money on anything else.
Why this guide exists
“Horses that are in discomfort dissociate from their bodies, and learn to project that feeling into their environment, which comes out as them spooking at butterflies or that scary door they’ve walked by 1,000,000 times. It’s not actually the environment, it’s that they don’t know how to feel safe in their own bodies.”
A note on that word. “Dissociate” here is Kat's shorthand for a horse that has stopped engaging with what is around them, and it describes something experienced horse people recognize. It is not a clinical finding: dissociation is a human psychiatric term with no established equine evidence behind it. What can be said with support is that pain and high arousal impair attention and flexible responding, and increase aversive associations.
A horse cannot tell you the saddle pinches. They can only get heavy, hollow, cold backed, girthy, spooky, or hard to catch, and then get labeled for it. Fit is where you look before you decide a horse has an attitude.
General education, not a substitute for a professional saddle fitter, your vet or your farrier. If your horse has white hairs, sores, muscle atrophy behind the withers, or is reactive to a light touch along the back, that is a veterinary conversation first.
The ten minute check
Do this with the saddle on a bare back, no pad, on level ground, with the horse standing square. The pad comes later. You cannot judge a saddle through it.
- 1. Set it where it belongs. Place the saddle well forward, then slide it back until it settles into the natural pocket behind the shoulder blade. Don’t drag it forward against the hair. That’s also where most people put it, and it’s too far forward.
- 2. Wither clearance. With the saddle settled and no rider, you want roughly two to four fingers of clearance between the withers and the gullet, and daylight along the length of the spine. Then sit in it and check again. Plenty of saddles clear an empty back and touch down under weight.
- 3. Spine clearance down the whole channel. Look through the gullet from front to back. Nothing should touch the spine anywhere along its length. The bars carry weight on the muscle either side, never on the vertebrae.
- 4. Bar angle against the horse. Crouch and look at where the bar meets the back just behind the shoulder. It should lie flat against the horse. If it gaps at the top and digs in low, the tree is too wide for him; if it perches high and digs in at the top edge, it’s too narrow.
- 5. Even contact front to back. Slide a flat hand under the bar from front to rear. You’re feeling for consistent, even pressure, not a tight spot at the front, a gap in the middle, and another tight spot at the back. (That gap is bridging. See below.)
- 6. Rock it. Press down on the pommel, then the cantle. A well fitted saddle stays put. If it seesaws front to back, the bars are more curved than the horse’s back.
- 7. Check it doesn’t sit on the shoulder. Have someone pick up a front leg and stretch it forward while you watch the bar. The shoulder blade needs room to rotate back under the front of the bar. A saddle jammed against the shoulder is a shortened stride and a horse that won’t go forward.
- 8. Check the back end. The bars should not extend past the last rib and onto the loin. On a short backed horse this is the fit problem people miss.
Then ride in it and look at the sweat. Ten minutes of standing still tells you less than one honest hour of work. The sweat pattern is the most useful diagnostic you have, and reading it is further down this page.
Contact, bridging and rock
Everything in western saddle fit comes back to one job: spread the rider’s weight evenly along the bars, on the muscle either side of the spine, without pressure points.
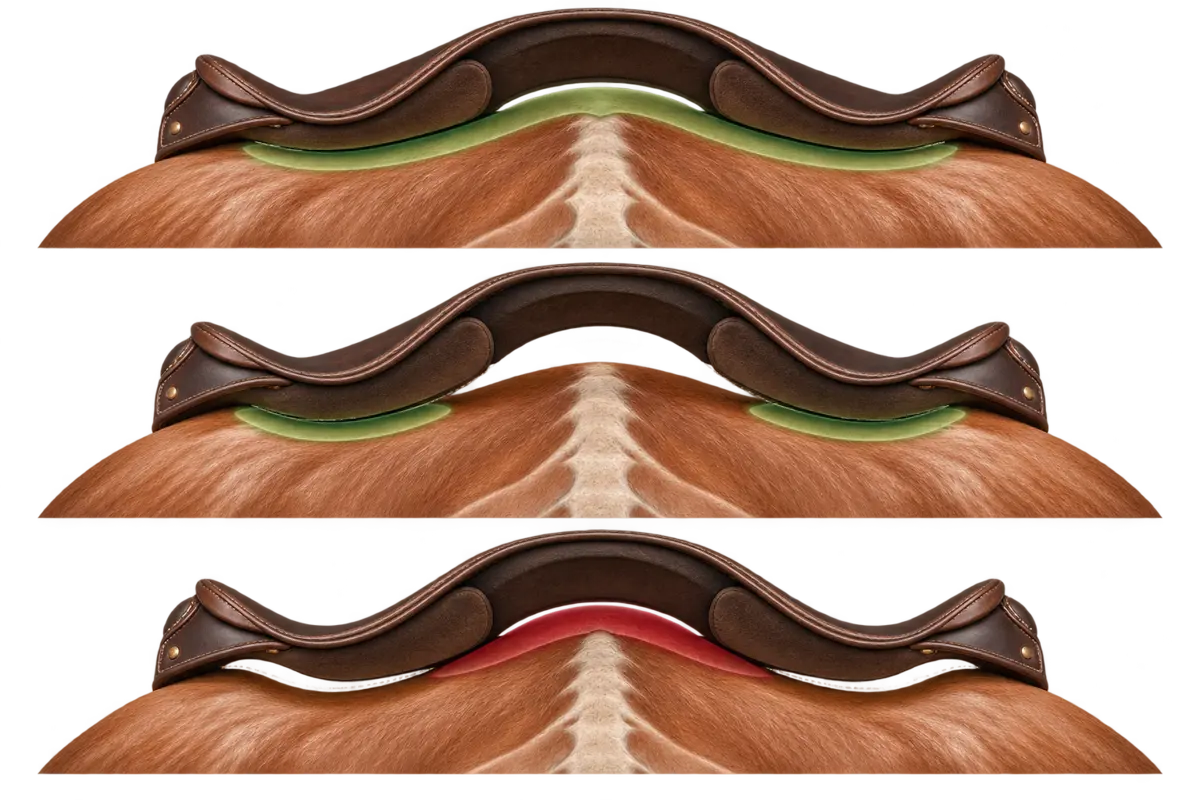
Even contact
The bar follows the back; pressure is shared along its whole length.
Bridging
Contact front and back with a hollow in the middle, so all the load goes through four small areas.
Rock
Bars more curved than the back. The saddle seesaws and concentrates the load in the middle.
Bridging is the common one
The front and rear of the bars touch and the middle doesn’t. The rider’s weight then gets carried at the ends of the bars: a lot of pressure through a small area, which is exactly how you get white hairs and sores.
It shows up as a horse that hollows, won’t round up, gets short strided, or is sore to palpation just behind the withers and again over the loin.
Rock is less common, same idea
The bars are more curved than the horse needs, so the saddle pivots on a small central area and rocks front to back as the horse moves. Concentrated pressure, plus a saddle that never feels stable.
Both are shape mismatches. Neither is fixable with a thicker pad. See below.
Bar angle and gullet width, in plain terms
A western saddle is built on a tree. The two long pieces that lie along the horse’s back are the bars; the arch between them at the front is the gullet. Two separate measurements matter, and people constantly confuse them:
Bar angle is the slope of the bars, how steeply they rise from the ribs toward the spine. A narrow, sharp withered horse needs a steeper angle; a round, mutton withered horse needs a flatter one. This is the measurement that decides whether the saddle actually fits.
Gullet width is the distance across that front arch. It’s what everyone quotes, because it’s a single number and easy to print.
You can have the right gullet width and the wrong bar angle, and the saddle will still hurt the horse. Width alone is not fit.
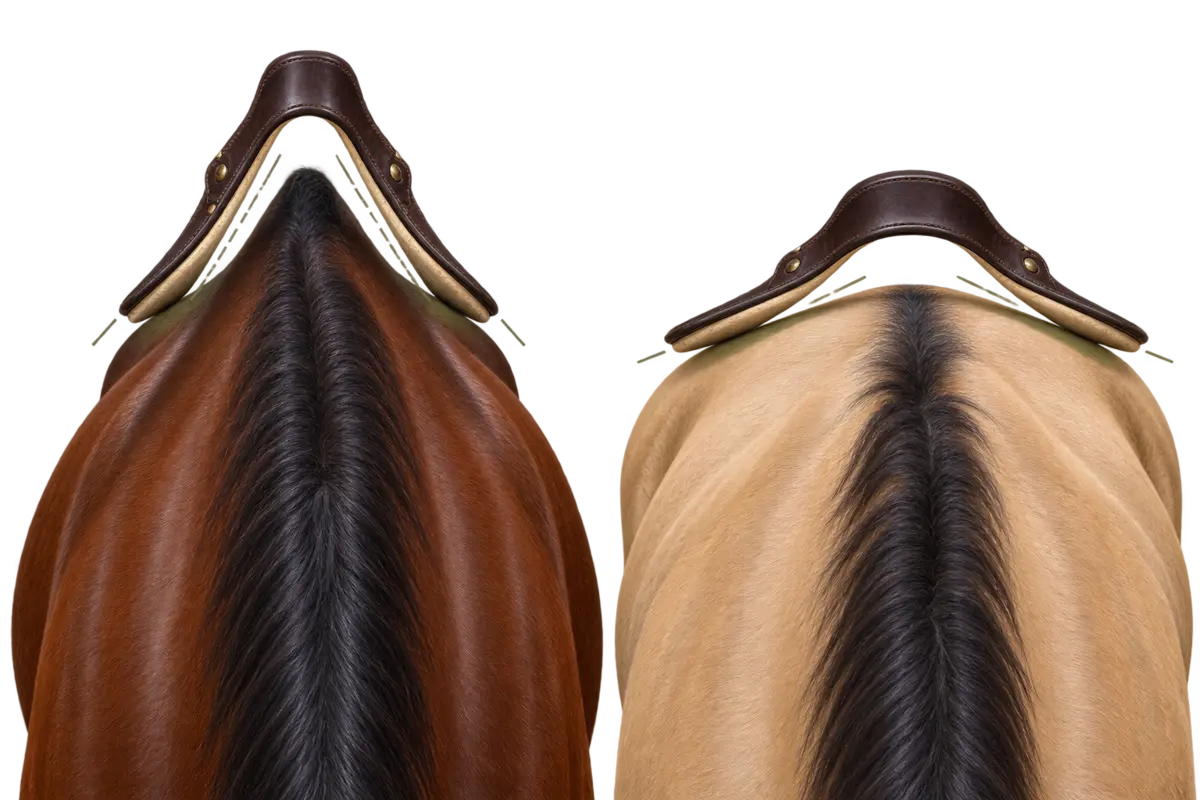
Steep bar angle
Matches a narrow, higher-withered back.
Flat bar angle
Matches a broad, flatter back.
| Tree name | Roughly | Typically suits |
|---|---|---|
| Regular / Quarter Horse bars | about 5¾ inches | Narrower horse with a defined wither |
| Semi-Quarter Horse bars (SQHB) | about 6 inches | The common middle: average build, some wither |
| Full Quarter Horse bars (FQHB) | about 6¼ to 6½ inches | Broad shoulder, flatter back, less pronounced wither |
| Extra wide / draft | about 6¾ to 7 inches | Very round, wide backed horses and drafts |
The catch nobody tells you at the tack store
There is no industry standard for these measurements. One maker’s “full quarter horse bars” is another maker’s “semi.” Gullet numbers are often taken on a bare tree rather than the finished saddle, and the same label can differ by a half inch between brands.
Use the labels to narrow the search. Judge the saddle on the horse.
Worth doing: take a wither tracing. A flexible curve or a piece of stiff wire molded over the back a couple of inches behind the shoulder blade, traced onto cardboard, gives you a template you can carry to a saddle sale, and a record of how your horse’s back changes as he gains muscle or age. Horses are not one shape forever, and a saddle that fitted a soft four year old often doesn’t fit the same horse in work three years later.
What the horse’s back is telling you
Pick what you’re actually seeing.
Dry spots in an otherwise even sweat pattern
Pull the saddle after a real working ride and look at the pattern on the back. You want even, symmetrical dampness under the whole bearing surface of the bars.
A distinct dry patch surrounded by sweat usually means pressure high enough at that spot to shut down the sweat glands underneath it. In other words, that is the hardest pressed area on the whole back. Common places: right behind the shoulder, and at the rear of the bars.
Also look for asymmetry. Sweat heavier on one side than the other is either a crooked saddle, a crooked rider, or a horse that isn’t moving evenly, and all three are worth knowing about.
One caveat: not every dry spot is pressure. A pad that’s dirty, slipped or compacted can produce one too. Check it twice, with a clean pad.
Patches of white hair
Scattered individual white hairs happen and mean little. A defined patch of white hairs is a record of sustained pressure. It means the hair follicles in that spot were damaged, and the horse has been telling you about it for a while.
Classic locations: on top of or either side of the withers (not enough clearance), and at the front or rear ends of the bars (bridging).
White hairs mean the fit problem is not new. Fix the cause; the marks themselves are usually permanent.
Behavior that shows up once you’re on
A horse fine on the ground and difficult under saddle is a fit question until proven otherwise. Things to notice:
- Hollowing, refusing to round up or reach down
- Short, choppy stride in front, often a saddle sitting on the shoulder
- Reluctance to go forward, or to pick up one lead in particular
- Bucking or humping specifically at the trot or canter, not at the walk
- Pinning, tail swishing or teeth grinding when asked to work harder
- A horse that gets steadily worse over a ride rather than warming up out of it
Pain and training are not alternatives, and the pattern does not reliably separate them. A horse that hurts learns from hurting: discomfort under saddle becomes an expectation, then a response, and by the time anyone is watching it looks like a training problem. Experimental work in ponies found that horses trained with negative reinforcement showed measurably higher heart rates and sought less human contact, with the effect still present five months later, which is exactly how a pain problem becomes a behavior problem.
So the sequence is: rule out pain first, then address what the horse learned, and expect both to be present. New or escalating behavior deserves a screen for pain, dental problems, vision, tack fit, environment, and what the horse has previously been taught to expect.
Girthy, cinchy, or cold backed
Ear pinning, snapping, stepping away, or a horse that humps and shuffles for the first few minutes. Girthiness has a broad differential and this page will not rank it, because the honest answer depends on the horse. Worth ruling out, in no particular order:
- Gastric ulceration. Genuinely common, and girthiness is one of the recognized signs, but it is diagnosed by gastroscopy, not by response to treatment. More on that here.
- Saddle or cinch fit, including a cinch pulled up too fast. Snug it in stages and walk the horse a few steps between.
- Pain elsewhere that the girth loads: sternum, ribs, thoracic spine, muscle, or skin lesions and old girth galls under the girth line.
- A learned response from a horse hurt previously by any of the above and now expecting it. That one is training, and it resolves much faster once the pain is gone.
All of these can be true at once, and more than one usually is. Rule out pain before you correct the behavior.
The saddle slips, rolls, or won’t stay centerd
The instinct is to tighten the cinch. That is almost never the answer and usually makes the horse resent it further.
- Slipping forward onto the shoulder. Often a tree too wide, sinking down and forward, or a mutton withered horse.
- Slipping back. Often a tree too narrow perching on top, or rigging position pulling it back.
- Rolling to one side. Check the horse for asymmetry, then check the rider. A rider who sits heavier on one seat bone will move a saddle over time.
A saddle that consistently slips to the same side is a reason to have the horse examined for lameness, before it is a reason to buy a different saddle.
This is the best-evidenced item on this page. In a study of 128 horses, the saddle slipped consistently to one side in 54 percent of horses with hindlimb lameness (38 of 71), compared with 4 percent of horses with forelimb lameness (1 of 26), none of 20 horses with back or sacroiliac pain, and none of 11 sound horses. When diagnostic analgesia removed the hindlimb lameness, the slip disappeared in 37 of those 38 horses.
A later survey of 506 sports horses in normal work found the same pattern: saddle slip in 24 percent of horses with hindlimb lameness alone, and 46 percent of those with hindlimb and forelimb lameness together, against 5 percent with forelimb lameness only.
A crooked rider, an asymmetric saddle and an asymmetric back all cause slip too, and are worth checking. But consistent, repeatable slip to one side warrants a veterinary lameness examination. Re-flocking a saddle for a horse that is actually lame behind treats the wrong problem, and the horse stays in work while you do it.
Greve L, Dyson SJ. An investigation of the relationship between hindlimb lameness and saddle slip. Equine Veterinary Journal 2013;45(5):570–7. · Greve L, Dyson SJ. The interrelationship of lameness, saddle slip and back shape in the general sports horse population. Equine Veterinary Journal 2014;46(6):687–94. No veterinarian has reviewed this page.
Hollows or dips just behind the withers
Muscle wastage behind the shoulder blade is a serious sign, not a conformation quirk. It generally means sustained pressure in that area has damaged tissue and the horse has stopped using those muscles properly.
This one is a vet call, not a tack store call. Get the back examined, then get the saddle assessed properly, and expect that the shape you’re fitting will change as the muscle comes back.
Pads, cinches and the things people use to paper over fit
Pads
Real wool felt or woven wool is still the standard, and for good reasons: it wicks moisture better than anything else available, it compresses to fill small voids, and used consistently with the same saddle and horse it develops a memory of that shape, which spreads pressure more evenly over time.
Foam and gel need more thought. Some trap heat against the back, which matters more the longer you ride. And some gel pads concentrate pressure rather than spreading it, the opposite of what you bought them for.
A pad does not fix a fit problem. Padding a saddle that’s already too narrow is exactly like putting a thick sock in a tight boot. Shims can fine tune a saddle that’s close; nothing rescues one that’s the wrong shape.
And keep it clean. A pad packed with dried sweat and hair is a hard, uneven surface, which is its own pressure problem.
Cinch and rigging
The cinch belongs at the heart girth, just behind the elbow, where the ribcage is narrowest. A rough guide for the pad and saddle: line up the front of the pad roughly with a vertical line up from the middle of the forearm, then adjust for your horse and saddle.
Where the rigging sits (full, 7/8, 3/4, center fire) changes the angle the cinch pulls and therefore where the saddle wants to travel. If a saddle constantly creeps, rigging position is worth looking at before you buy a breast collar to hold the problem in place.
Snug it in stages. Take it up part way, walk the horse a few steps, take it up again. Do that consistently and a lot of “cinchy” horses quietly stop being cinchy.
Check it again after ten minutes of work, and check the off side, which most people never look at.
And the rider’s half of it
Seat size matters for the horse too, not just your comfort: a rider perched in a seat that’s too small sits back against the cantle, and a rider swimming in one that’s too big slides around. Both change where the load lands.
You want to be able to sit with roughly a hand’s width between your thigh and the swell, and your seat bones landing in the low point of the seat, not pushed behind it. If you’re fighting to stay balanced, your horse is dealing with a moving load, which is harder work than a heavier one.
The Lazy K position, stated plainly
You don’t solve a training problem with more equipment.
Kat is direct about this: gimmicks, bigger bits, tie downs and spurs get used “to constrict, control and manipulate a horse into doing a maneuver out of fear.” If a horse gets heavier and the answer is a harsher bit, the horse just learns to brace against something sharper.
That is not the same as saying bits are cruel. In the vaquero tradition this horsemanship comes from, the progression runs snaffle → hackamore → two rein → straight up in the bridle, and the finished bridle is a signaling device that only makes sense on a horse with years of preparation behind it. The failure isn’t the equipment. It’s rushing the horse to it.
Practical fit notes
- Snaffle width. You want a small amount of clearance either side of the mouth, not a bit pinching the lips, and not one sliding through. Measure the horse rather than guessing from the last horse you owned.
- Height in the mouth. The common guide is a slight wrinkle at the corner, but treat it as a starting point, not a rule. Mouths differ enormously in tongue thickness and palate height. Watch the horse, not the wrinkle count.
- Have the mouth looked at. Sharp points, wolf teeth, a bitting problem that’s really a dental problem. Extremely common, and easily missed.
- Bosal fit. A hackamore works off the nose and jaw and needs to sit snugly without chafing; thicker bosals are generally the milder ones. It is a training instrument with a real learning curve, and worth being shown in person rather than learned off the internet.
- Rope halter and a long lead. If you buy one piece of gear after reading this page, make it this. A well made rope halter and a 12 to 14 foot lead are the foundation of all the groundwork, and lightness on the ground is what makes lightness under saddle possible.
If something feels wrong, check in this order
- Pain first. Vet, teeth, feet. A lameness exam if anything is uneven.
- Then fit. Saddle, cinch, pad, bridle. Run the ten minute check above, then a sweat pattern after real work.
- Then the rider. Balance, position, and whether the ask is actually clear.
- Then the training. Once the horse is comfortable and the question is legible, most of what looked like resistance turns out to have been an answer to a different question.
People almost always run that list backwards: more training, then a different bit, then eventually a vet. Running it forwards is cheaper, faster and considerably fairer to the horse.
Want a second set of eyes on it?
Tack checks are part of what Kat does, on the horse, in your own gear, with the horse moving. Call or text and describe what you’re seeing.